The Best Domino Cookies Recipe
Why You’ll Love This Domino Cookies Recipe
Some cookies are simply made to bring out your inner child, and Domino Cookies are exactly that kind of treat. Imagine crisp yet chewy cookies dotted with rich chocolate chips and decorated with playful domino-style patterns. They’re not only delicious but also fun to prepare—making them perfect for bake sales, kids’ parties, holiday cookie swaps, or just a cozy weekend baking session at home.
What sets Domino Cookies apart from regular chocolate chip cookies is their presentation. Each cookie looks like a mini domino piece, decorated with contrasting chocolate or icing dots that mimic the numbers you’d find on real domino tiles. These cookies are an edible game piece and dessert all in one. Best of all, the recipe is surprisingly easy, so even beginner bakers can enjoy making them.
In this article, you’ll find a complete guide to making Domino Cookies from scratch, along with ingredient substitutions, baking tips, and fun variations to try. By the time you’re done reading, you’ll have everything you need to make your own batch of perfectly chewy, sweet, and whimsical cookies.
Table of Contents
Ingredients for Domino Cookies
Here’s what you’ll need to make a classic batch of Domino Cookies:
- 2 ¼ cups all-purpose flour
- 1 teaspoon baking soda
- ½ teaspoon salt
- ¾ cup unsalted butter, softened
- ¾ cup brown sugar, packed
- ½ cup granulated sugar
- 2 large eggs
- 2 teaspoons pure vanilla extract
- 1 ½ cups semi-sweet chocolate chips
- ½ cup white chocolate chips (for decorating the “domino dots”)
- Optional: 2 tablespoons cocoa powder (for a richer chocolate dough base)
Ingredient Notes & Substitutions
- Butter: If you don’t have unsalted butter, use salted butter but reduce the added salt to ¼ teaspoon.
- Sugar: Brown sugar gives Domino Cookies their chewy texture. If you’re out, you can use all granulated sugar, but the cookies will be crispier.
- Flour: All-purpose flour works best, but you can use a 1:1 gluten-free flour blend if needed.
- Chocolate Chips: Semi-sweet chocolate is the classic choice, but you can use milk chocolate, dark chocolate, or even a mix.
- Decoration Options: If you don’t want to use white chocolate, melted royal icing or candy melts can also create the domino dots.
Step-by-Step Instructions for Making Domino Cookies
Step 1: Prepare Your Baking Equipment
Preheat your oven to 350°F (175°C) and line two baking sheets with parchment paper. This prevents sticking and makes cleanup easier.
Step 2: Mix the Dry Ingredients
In a medium bowl, whisk together the flour, baking soda, salt, and cocoa powder (if using). Set aside.
Step 3: Cream the Butter and Sugars
In a large mixing bowl, beat together the softened butter, brown sugar, and granulated sugar using a hand mixer or stand mixer. Beat for about 2–3 minutes until the mixture is light and fluffy. This step helps aerate the dough, giving the cookies a soft texture.
Step 4: Add the Wet Ingredients
Beat in the eggs one at a time, followed by the vanilla extract. Scrape down the sides of the bowl to make sure everything is evenly combined.
Step 5: Combine Wet and Dry Ingredients
Gradually add the dry ingredients to the butter mixture, mixing just until incorporated. Don’t overmix—this can make the cookies tough.
Step 6: Fold in Chocolate Chips
Stir in the semi-sweet chocolate chips by hand using a spatula. The dough should be thick but scoopable.
Step 7: Shape the Cookies
Scoop about 2 tablespoons of dough and roll it into a ball. Flatten slightly into a rectangle or oval shape to resemble a domino tile. Place them about 2 inches apart on the prepared baking sheets.
Step 8: Bake the Cookies
Bake for 10–12 minutes or until the edges are golden brown but the centers are still slightly soft. They will continue to firm up as they cool.
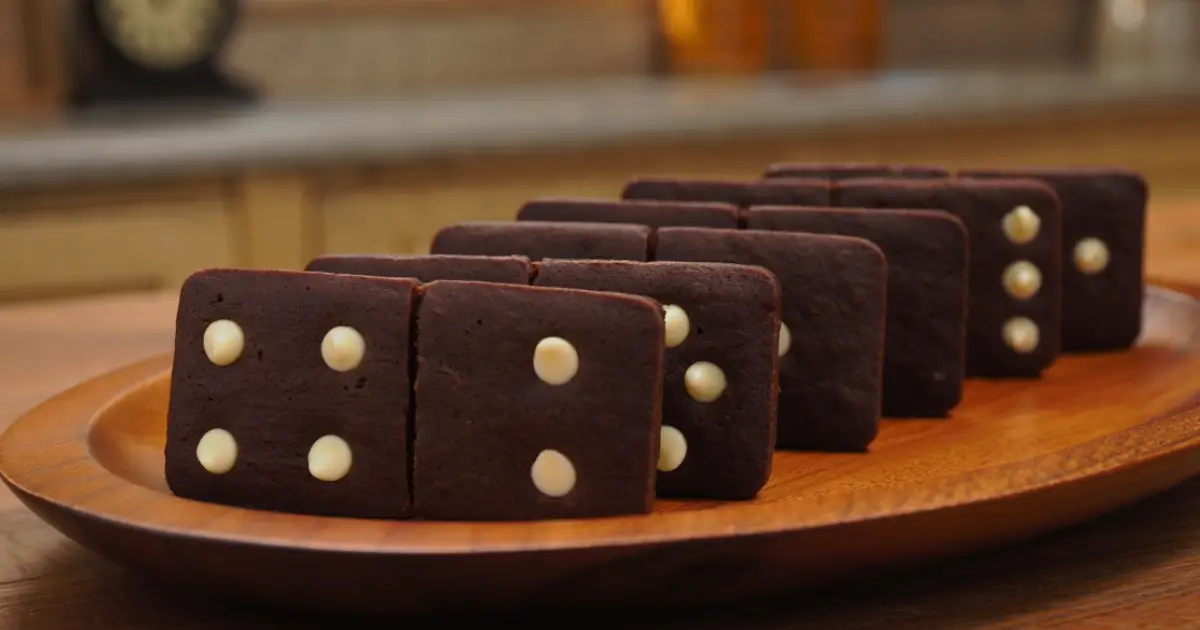
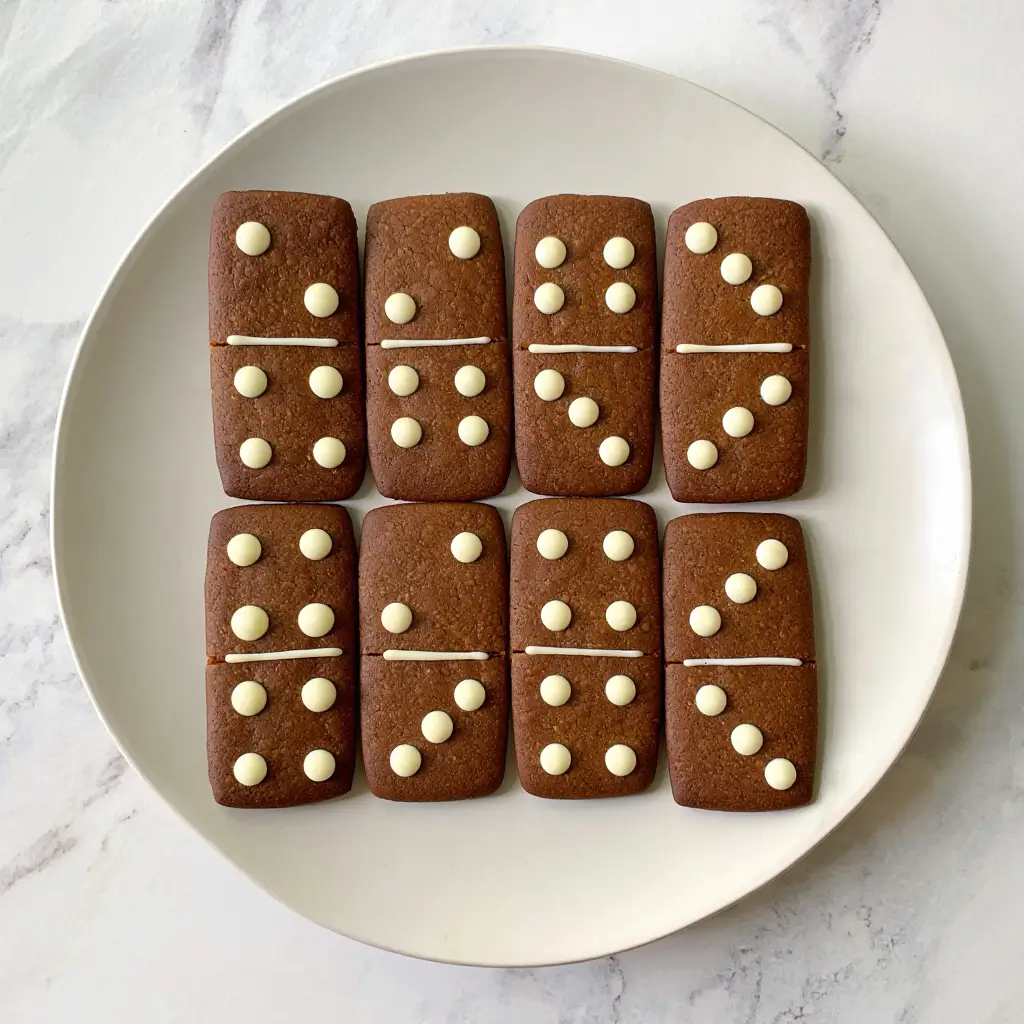
Step 9: Decorate the Domino Dots
Once the cookies are completely cooled, melt the white chocolate chips in a microwave-safe bowl in 20-second intervals, stirring between each. Transfer the melted chocolate to a piping bag or a resealable plastic bag with the corner snipped off.
Pipe small dots onto each cookie to mimic domino numbers. You can also use melted dark chocolate on lighter cookie bases for contrast. Allow the dots to set before serving.
Tips for Perfect Domino Cookies
- Chill the Dough: For thicker, chewier Domino Cookies, refrigerate the dough for at least 30 minutes before baking.
- Uniform Sizes: Use a cookie scoop to make evenly sized portions for consistent baking.
- Don’t Overbake: Pull the cookies out when the centers look slightly underdone. They’ll set as they cool.
- Creative Decorating: Use both white and dark chocolate to create a true domino effect. You can even make sets of matching “domino tiles” if serving at a party.
Fun Variations to Try
Domino Cookies are already fun and tasty on their own, but you can easily customize them to suit your taste or the occasion. Here are some creative spins you’ll love experimenting with:
Double Chocolate Domino Cookies
If you’re a true chocoholic, this version is for you. Add 2 tablespoons of cocoa powder to the dough before mixing in the chocolate chips. The rich cocoa base makes the cookies extra fudgy, and the white chocolate domino dots will pop beautifully against the dark background.
Peanut Butter Domino Cookies
For a nutty, slightly salty twist, replace half of the butter in the recipe with smooth peanut butter. The peanut butter flavor complements the chocolate perfectly while giving the cookies a denser, melt-in-your-mouth texture.
Festive Domino Cookies
Turn Domino Cookies into holiday-ready treats by tinting the domino dots with gel food coloring. Think red and green for Christmas, orange and black for Halloween, or pastel shades for Easter. These colorful cookies will add a festive flair to any celebration.
Mini Domino Cookies
Why not shrink things down? Scoop just 1 tablespoon of dough per cookie to make bite-sized Domino Cookies. Decorate them with fewer dots to keep the design simple. These minis are great for kids’ parties, buffets, or snackable gifts in little bags.
Other Creative Ideas
- Mint Domino Cookies: Add a teaspoon of peppermint extract to the dough for a refreshing spin.
- Caramel Drizzle Domino Cookies: Drizzle caramel sauce over the cooled cookies for a sweet finishing touch.
- Oatmeal Domino Cookies: Replace ½ cup of flour with rolled oats for added texture and a rustic flavor.
With these variations, you’ll never run out of new ways to enjoy Domino Cookies. Each batch can be tailored to your mood, the season, or the crowd you’re baking for.
Storage and Make-Ahead Instructions
Domino Cookies store beautifully, so you can make them ahead of time for events or just to have treats on hand.
- Room Temperature: Store cooled cookies in an airtight container for up to 5 days.
- Freezing Dough: Roll the dough into rectangles, freeze on a tray, then store in a freezer-safe bag for up to 3 months. Bake from frozen by adding 2–3 extra minutes.
- Freezing Baked Cookies: Place cooled cookies in layers with parchment paper between them, then freeze for up to 2 months. Decorate after thawing for best results.
Prep Time, Cook Time, and Servings
- Prep Time: 20 minutes
- Cook Time: 10–12 minutes per batch
- Total Time: 30–35 minutes
- Servings: About 24 cookies
Conclusion: Bake Domino Cookies for Fun and Flavor
Domino Cookies are more than just a recipe—they’re a creative experience that combines baking with playfulness. Unlike ordinary cookies, these treats give you the chance to decorate each piece like a mini domino tile, turning dessert into something interactive and memorable. From the chewy centers to the charming chocolate dots, Domino Cookies prove that simple ingredients can create something both delicious and eye-catching.
What makes Domino Cookies truly special is their versatility. You can bake them for a family gathering, pack them into lunchboxes, or even bring them to a holiday party where they’ll instantly become conversation starters. Kids love decorating them, and adults appreciate the nostalgic charm they bring to the table. Plus, they’re easy enough for beginner bakers yet customizable for those who love to experiment with new flavors and variations.
If you’re looking for a dessert that’s equal parts fun and flavorful, Domino Cookies are the perfect choice. Try making a batch this weekend, get creative with the designs, and watch how quickly they disappear once they hit the plate. With their playful design, chewy texture, and irresistible taste, Domino Cookies are destined to become a favorite in your kitchen.